Meet Arduino, the tiny microcontroller that’s good at doing what your computer can’t.
The computers we use every day are powerful, but they’re terrible at knowing what’s going on around them. Your laptop isn’t exactly equipped to sense light or moisture, for example. Arduino, on the other hand, is specifically designed to stay keyed in to the outside world. It’s equipped with a board full of inputs and outputs for sensors to simplify communication.
The Arduino was developed by Massimo Banzi and his cofounders out of Ivrea, Italy, who named the device after his favorite bar. Banzi wanted his design students to have a cheap, easy solution for prototyping hardware solutions. Since Arduino’s release in 2005, it has gone from a teaching tool to a DIY project for makers all over the world. Multiple models exist now—the more advanced Arduino Due, the souped-up Mega and the tinier Nano.
Regardless of which Arduino model you buy, the utility of the microcontroller comes out when you use it for “Internet Of Things” projects—whether you want to connect to the real world, the cloud, or both, Arduino makes it easy. In this primer, we’re going to highlight two ultra-basic projects in order to show just how simple Arduino can be.
Getting Started With Arduino
Before we can fully understand what Arduino is, it’s important to realize what it isn’t. An Arduino is not a computer (the way Raspberry Pi is). It can’t be programmed independently; it needs to be plugged into a computer. It is not especially powerful either—the Arduino Uno has 32 KG of memory, while the average Macbook has about 8 gigs.
So in order to work with Arduino, you can’t just buy the microcontroller and be done with it. For the following projects, here’s what you’ll need:
Hardware
- Arduino Uno. “Uno” means one in Italian, but this isn’t the first Arduino ever built, just the most recent iteration of the most basic Arduino microcontroller. These projects will work with almost any model, but this is the one I used.
- Type B USB cable. I haven’t seen one of these old-style USB ports in years, but you might remember them from older electronic devices. They cost about $5-10.
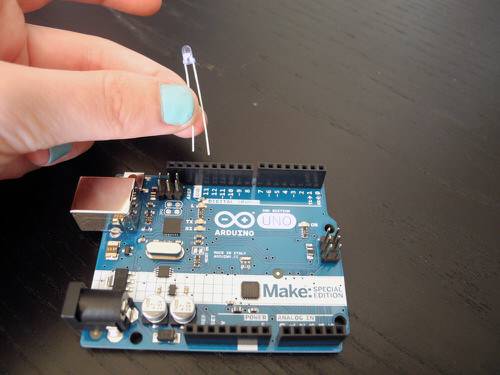
- LED light. A tiny light-emitting pin we can stick directly on the Arduino; these also tend to be pretty cheap.
Software
- Arduino IDE, which stands for “integrated development environment,” is free open-source software for writing “sketches,” which is what Arduino users call programs.
When you open Arduino IDE for the first time, you need to establish the port where the software ought to expect the Arduino to show up. Go to “Tools,” then “Serial Port.”
- On OS X, the serial port should be something like “/dev/tty.usbmodem” for the Uno, though it may be different for other types of Arduino boards. Mine is “/dev/tty.usbmodem1421.”
- On Windows, the serial port should be COM3 or higher, as COM1 and COM2 are usually reserved for other hardware. In order to know for sure, you can unplug the Arduino and reopen the IDE menu. The entry that no longer appears is what your Arduino was.
In general, you shouldn’t ever worry about unplugging your Arduino board. We know better than to do that with fully-functional computers, including Raspberry Pi, because they could be running an important OS task in the background. But Arduino is just a microcontroller; it’s definitely not writing anything to memory unless you’re actively telling it to do so.
Arduino Hardware Sketch: Blink An LED
In this first project, we’ll overview the most basic way for Arduino to produce physical output, in this case, a blinking LED light.
We’re going to write a very simple sketch to get an LED to strobe—or as my friend cleverly told me when I proudly showed him my iteration, “a very tiny rave.” This program is based on the open-source Blink sketch, which can be found on Arduino’s official site.
First, set up the hardware by sticking the LED’s two prongs into GND and pin 13 on the Arduino.
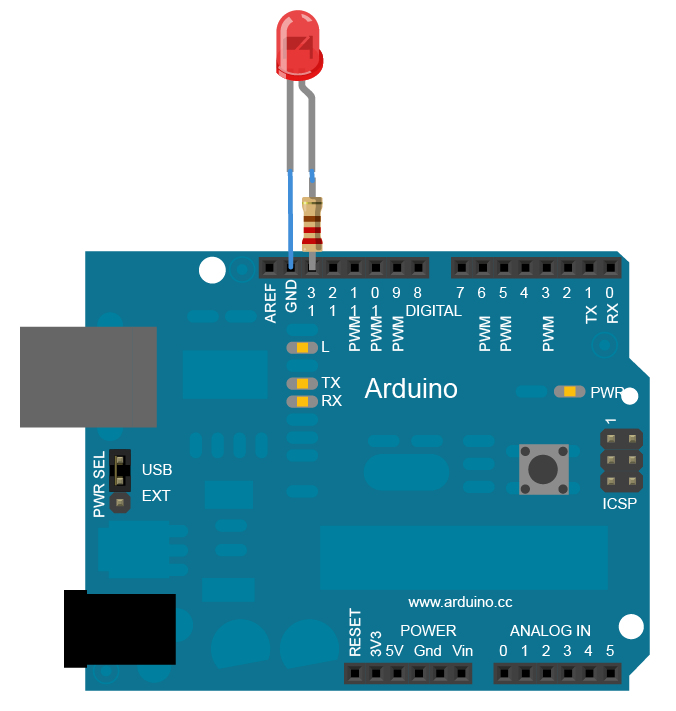
NOTE: If you plan on keeping an LED plugged into a turned-on Arduino for an extended period of time (say, longer than it takes to do this project), it’s safer to also use a 220 ohm resistor. Here’s a diagram of what that would look like, courtesy of the Arduino official site.
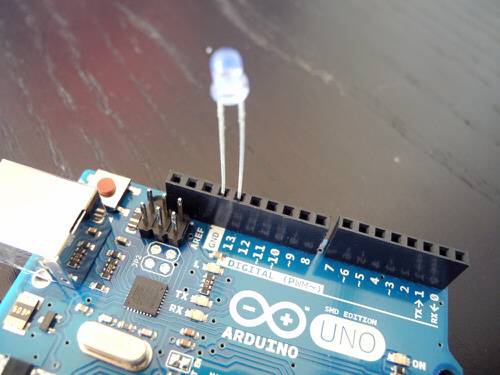
One of the prongs is slightly shorter than the other—that shorter prong is the negative lead, and therefore the one that goes in the “ground,” or GND input/output.
Now let’s move onto writing the program. First, let’s name it. Arduino will ignore anything on a line following two forward slashes, so this is a great way to leave notes for yourself:
// Program 1: Making an LED blink on and off
When hardware’s involved, we need to tell the Arduino where it should expect a signal among its 14 different input/output pins. In this case, we stuck the LED in pin 13. This is how we name the LED stuck in pin 13, where “LED” is just the name I gave the variable:
int LED = 13;
Every Arduino sketch contains two components: void setup() and void loop(). These are the bare minimum for any Arduino program, without which it won’t function.
In void setup(), we tell Arduino to initialize the pin as an output:
void setup() {
pinMode(LED, OUTPUT);
}
In void loop(), we tell Arduino to “write” a value to pin 13. Since we want it to blink, we’re going to ask it to write a sequence of four different commands in a row. As you can guess by the word “loop,” we expect this to continue until we turn the Arduino off.
In the following code, LED stands for the same variable we assigned before. “HIGH” tells the Arduino to deliver five volts of power to the LED, while “LOW” delivers zero volts. Telling it to delay for “1000” pauses the program between blinks for a full second.
void loop() {
digitalWrite(LED, HIGH);
delay(1000);
digitalWrite(LED, LOW);
delay(1000);
}
When you put it all together, here’s what the entire sketch should look like (again, Arduino ignores anything after two forward slashes, so those are just notes for yourself):
// Program 1: Making an LED blink on and off
int led = 13; // name the LED in pin 13
void setup() {
pinMode(LED, OUTPUT); // tell Arduino the pin in question is an output
}
void loop() {
digitalWrite(LED, HIGH); // deliver 5V to LED
delay(1000); // wait a second
digitalWrite(LED, LOW); // deliver 0V to LED
delay(1000); // wait a second
}
Press the checkmark to verify that your code is bug-free, and then press the play button. If your Arduino is plugged in, it should begin running your blinking light sketch.
Arduino Software Sketch: Print To Computer
Let’s now switch gears and try out the most basic project for demonstrating how Arduino produces a digital output.
We’re going to set up the Arduino to “print,” or display information on your computer screen. This sketch is based on Paul Bianchi’s Arduino printing tutorial.
There’s no hardware in this case, so we can just jump right into the program. Once again, it’s going to take place in two parts: void setup() and void loop().
In void setup(), we’re going to open up a line of communication between Arduino and your computer, specifically at 9600 bits per second. If you use another number, you may end up getting gibberish printed to your computer instead of words.
void setup() {
Serial.begin(9600);
}
The void loop() section is going to look a lot like the one in our LED sketch. We’re going to give it two separate commands, telling it to pause for a full second in between them. Println is the Arduino language command to get something to display on your computer. Note the name “Println” uses a lowercase “L,” not an uppercase “i”!
void loop() {
Serial.println(“hello”);
delay(1000);
Serial.println(“world.”);
delay(1000);
}
Put it all together with a title and some comments, and it should look like this:
// Program 2: Make Arduino Print “Hello World” to Computer
void setup() {
Serial.begin(9600); // open a 9600 baud communication line to computer
}
void loop() {
Serial.println(“Hello”); // write the word “Hello”
delay(1000); // wait a second
Serial.println(“World”); // write the word “World”
delay(1000); // wait a second
}
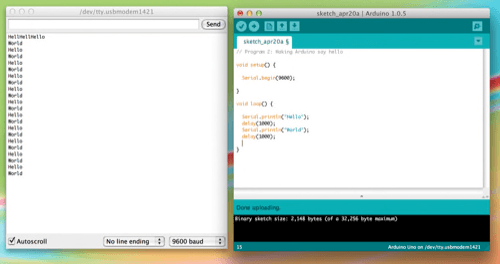
Verify your code and run it. Nothing will appear until you click on “Serial Monitor” at the upper righthand corner of the Arduino IDE window. You should see a steady stream of “Hello world,” over and over again until you unplug Arduino. You’ll see it’s not perfect: mine always starts with a bit of gibberish but soon rights itself.
These two Arduino projects are both extremely basic, but by executing them you can already begin to see the potential Arduino has to offer as a device that can communicate with sensors and write results to your computer. And if you combine these two projects—for example, you could connect a thermometer to your Arduino and tell it to write the temperature to your laptop—you’ll soon realize the possibilities for Arduino are virtually endless.


