Gesture Search is an experimental application introduced to Android back in March of last year. So while I know that it isn’t new per se, it’s new to me, as a recent Android convert. And to be honest, it takes a little practice. I’m not sure how many Android users out there are using (or are aware of) Android Gesture Search, so I thought I’d document the process of getting it set up and using it here, in case you want to give it a try.

Getting Started

Before you begin, you’ll need to download the Gesture Search app from the Google Android Market – it’s not a built-in feature in the Android operating system itself. Another caveat – Gesture Search works on Android 1.6 and higher, but that should cover most of you out there, I’d hope.
Once the app is installed, you need to launch it from your Applications list and tap “Accept” on the Terms of Service pop-up. You can optionally have the app installed on your homescreen by leaving the checkbox on this screen checked, as it is by default.
After tapping “Accept” you can also optionally offer your feedback to Google by way of the opt-in gesture information privacy screen. Check the box to share your Gestures with Google or leave it unchecked if you’re not interested in providing feedback. Then press “Continue.”
Now that the setup is out of the way, you can begin using the app, which basically functions like a universal search for your phone. Just launch the app to perform your first search.
Currently, the app lets you draw gestures in the form of letters (both capital and lowercase), numbers and you can draw a horizontal line for a space.
Practice #1: Search for a Contact
- Launch the Gesture Search app.
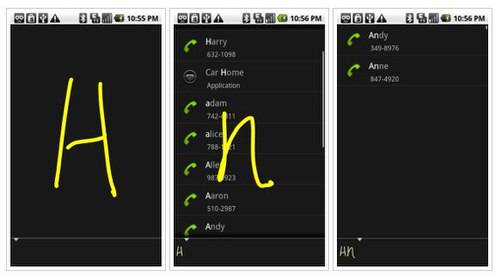
- On the blank screen, draw the first letter of a contact’s name, either first or last. You don’t have to wonder how your handwriting attempt went, because gesture search shows you the letter you drew on the screen.
- Now narrow down the search by drawing the second letter in that person’s name, again using either an uppercase or lowercase letter.
- Continuing drawing letters until you find the contact you want.
- You can then tap the green phone icon to call them immediately or tap their name to view their contact info.
Practice #2: Erase a Previous Search
Just as important as knowing how to search is knowing how to clear one. From the bottom of the screen, where your previously drawn letters appear (underneath the line), draw a horizontal line from left to right. This erases your past query entirely.
Practice #3: Find an App, Song or Phone Setting
Gesture Search can also be used for other information besides contacts. To enable Gesture Search to access this info, you’ll need to head into the settings area so it can index these items.
- From your phone’s menu button, tap “Settings.”
- In the Settings screen, check the boxes under “Searchable Items” for the other things you want Gesture Search to index. You can pick from Browser (Bookmarks), Apps, Music and Settings (meaning, the names of the phone’s various settings).
- Once you’ve selected your items, hit the “Back” button.
- Gesture Search will now index your additions. Try another practice round using the above steps to see if it worked.
Turn on Motion Activation
For even more fun with Gesture Search, you can set it to automatically activate through a flip of your phone, a special “double-flip” motion you can learn to do by watching the animation in the Help menu or this YouTube video.
- ?From your phone’s menu button, tap “Settings.”
- Tap “Activate with motion”
- The setting is set to “disable” by default. You can pick from 3 options here: “Hard to trigger,” “Normal” and “Easy to Trigger.”
- Tap the bullet next to your choice then “OK” on the message that appears.
- Exit to your homescreen.
- Practice the motion. If it doesn’t activate, up the setting to “Easy.”
Note: the motion setting doesn’t work on my Samsung Galaxy phones. Your mileage may vary. Google says it has only tested the motion on the Nexus One, Motorola Droid and T-Mobile G1. Boo!


