Gmail users with iPhones, iPod Touches and iPads have to make compromises. They can use Google’s Web-based mobile Gmail and Calendars, they can use Google’s rather limited Gmail app, or they can deal with the pain of trying to make Gmail and Google Calendars work with Apple’s built-in apps.
Setting up mail and calendar accounts on an iPad or iPhone isn’t that hard to do. But for Gmail users, it’s trickier than it needs to be. It’s not hard to set up the basic accounts, but features like multiple calendars, “Send Mail As,” contact sync, and server-side deletion of messages take some finagling. Fortunately, after a little bit of setup labor, it’s possible to get completely up and running on Apple’s iOS Mail, Contacts and Calendars with Google as the back end. Here’s what you need to know.
Google does offer step-by-step instructions for setting up complete sync, but in true Google fashion, it’s still in beta, and there are known issues. After years of experimenting, I’ve found a slightly more complicated set-up that, once finished, works better than Google’s method. It’s also much more reliable than iCloud sync, which I tried. Here’s my prescription for fully functional Gmail and Google Calendar sync on iOS.
If you want to make sure everything goes smoothly, you might want to delete all your existing mail and calendar accounts that use your Gmail address first.
1. Set Up Google Sync For Your Device
This is the part few people know about. There’s actually a website you have to use to turn on full Google syncing capabilities on your iOS device (BlackBerry and Windows Phone, too). It’s located at m.google.com/sync/. On the device you want to sync, go to that address in Safari and turn it on.
There are a few options there. You can enable ‘Send Mail As,’ so if you use other email addresses from your Gmail account, you’ll be able to use those aliases on iOS as well. You can actually add send-as aliases yourself from within the iOS mail settings*, but they won’t look right to the recipient unless you turn them on here first.
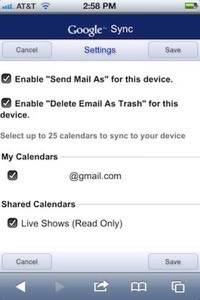
Note: this checkbox merely enables sending from your other addresses via Gmail. To actually add your additional addresses to the built-in Mail app, you have to follow the instructions in the footnote of this post.
You can enable ‘Delete Email As Trash,’ which the normal Gmail account settings on iOS don’t allow you to do. If you just create a Gmail account on iOS the easy way, your only option is to archive messages, which takes up storage space on your Gmail account even if you don’t want the messages anymore. By checking this box, you’ll be able to delete messages on the server side and still archive the ones you want to keep.
Finally, you can also select up to 25 of your Google calendars to sync to your device. Setting up Gmail the easy way in Settings only allows you to sync the one main calendar associated with your Gmail address. But what good is that? Google Calendars allows each user to create different calendars for different things. From the Google Sync website, you can turn all of those on, even shared calendars to which you’ve subscribed.
2. Set Up An Exchange Account For Calendars (And Contacts If You Want)
So far, we’re still going by Google’s book. The next step is to set up a Microsoft Exchange account – not a Gmail account – for your calendars (and contacts). This will allow you to accept invitations to events and make sure all your event reminders go off on your iPhone or iPad.
But after too many syncing problems, I no longer sync email this way. We’ll address that in the next section.
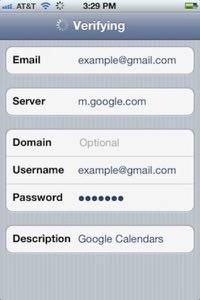
Go to Settings > Mail, Contacts, Calendars and add an Exchange account. Enter your Gmail address in ‘Email,’ again in ‘Username,’ and enter your password. Leave ‘Domain’ blank. In ‘Description,’ instead of “Exchange,” put in “Google Calendars.” Then hit ‘Next.’
On the next screen, a field called ‘Server’ appears. Enter m.google.com. After you save that, you’ll see the radio buttons for ‘Mail,’ ‘Contacts’ and ‘Calendars.’ Turn on calendars and turn off mail. And before we proceed, let’s talk about contacts.
Personally, I find Google contacts sketchy. I use Apple’s address book for contacts, which is also what all other apps use, so it makes more sense to me to keep contacts there instead of in Gmail. I have contact syncing turned on for my iCloud account, and I don’t use any Gmail contacts features. I know iCloud can be spotty, but contacts are the one thing that seems to always sync perfectly.
That said, if you use Gmail contacts, you can turn them on at this point to sync them with your address book.
3. Set Up A Generic IMAP Account For Email
Google’s instructions don’t take this extra step, but I promise it works better. Apple Mail’s communication with Gmail can be iffy, and this is the best remedy.
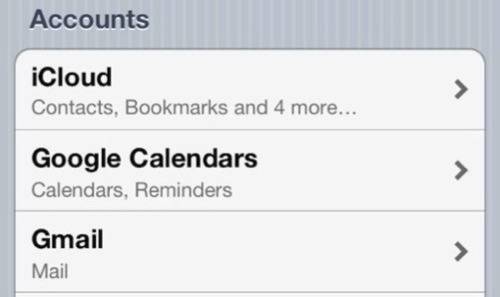
In the Mail, Contacts, Calendars menu, you now have an Exchange account called Google Calendars for calendars (and maybe contacts), and you probably already have an iCloud account for other things. That’s also where you’ll sync contacts if you do it my way.
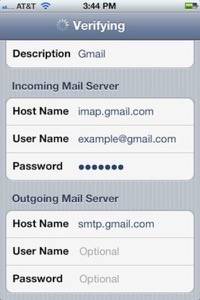
Now you’re going to create a third account, this one just for email, but don’t use the Gmail shortcut. It won’t work correctly with all the Google Sync stuff we set up in step one. Tap ‘Add Account,’ scroll all the way to the bottom, and tap ‘Other.’ Tap ‘Add Mail Account’ on the next screen.
Fill in your full name, email address, password and description on the next page. I recommend ‘Gmail’ as the description.
On the next screen, fill in the incoming and outgoing mail servers. The incoming host name is imap.gmail.com. You must fill in your Gmail address and password again under ‘Incoming Mail Server.’ The outgoing host name is smtp.gmail.com. Normal Gmail users don’t have to enter login info for outgoing mail, but Google Apps users (and some others) do. If you can’t send mail after following the instructions in this guide, try adding your login info for outgoing mail and see if that fixes it. (thanks, commenters!)
You Did It!
I know. That was way too much work. But now you’re all set, and your built-in Mail and Calendars (and maybe Contacts) apps should be syncing properly with Google. As far as you’re concerned, it’s all one unified account. All that black magic that got you set up can be a secret. In a Google-vs-Apple world, this is the best customer service we can get if we want to use both. But after all this annoying setup, it just works.
* How to set up more send-as addresses:
This is a geeky feature, so I made it a footnote, but if you have multiple email addresses you use for sending email through your Gmail account, this is how you set them up.
After you’ve done all of the above, go to the settings for your mail account. Under ‘IMAP Account Information,’ you’ll see a field called ‘Email.’ It will have your Gmail address in it. To add more send-as addresses, all you have to do is put a comma-separated list of addresses into that field. The problem is, you can’t type commas into that field.
So tap on the ‘Email’ field, copy the email address to the clipboard, and go to the Notes app or something. Paste it there, and then type all the email addresses you want to send from in the order you’d like to see them, separated by a comma and a space, like so: [email protected], [email protected], [email protected]. Then copy that whole list, go back to your email settings, and paste the whole thing into that ‘Email’ field.
Next time you send a message, you’ll see a drop-down menu that lets you pick which address from which you want to send.
