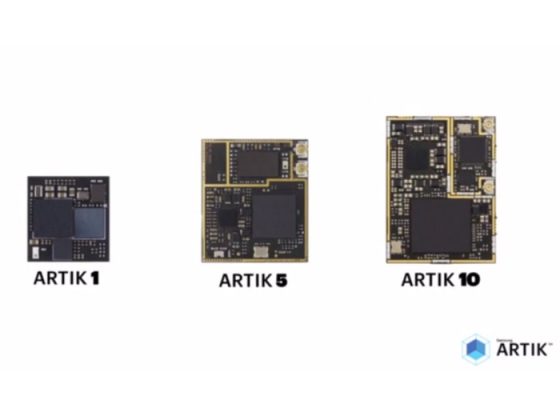
Samsung’s single board computers- The ARTIK dev boards have been commercially launched earlier this year. The ARTIK 5 and ARTIK 10 boards have support for multiple OS and that includes the likes of Ubuntu, Fedora and of course Tizen. The development boards run Fedora out of the box and since these are relatively new boards compared to main competition the Raspberry Pi which is in its third generation now, the ARTIK community is still small making it a hard time for beginners to work with the boards.
Now we can’t think of anything better than helping the new Artik community boot Tizen 3.0 OS on their ARTIK 5 or 10 boards. So lets cut to the chase and start giving some Tizen love to your ARTIK boards.
The Easy Way- Booting a prebuilt image (ARTIK 10)
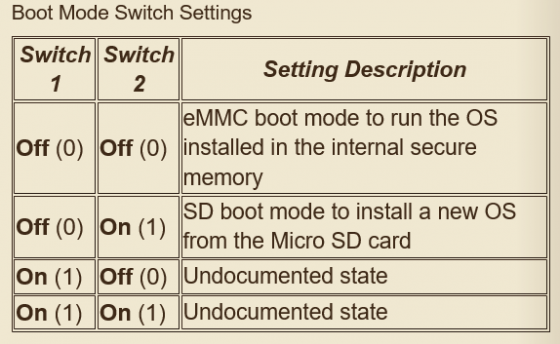
If you happen to have a ARTIK 10 and want a bootable image of Tizen 3.0 without wasting much time in making, you’re in luck. A huge shoutout to Philippe Coval for this pre-built image of the Tizen 3.0 OS with the added goodness of IoTivity. All that you have to do is download the image file (md5=0d21e2716f67a16086fdd2724e7e11f1), flash it to a micro SD card of at least 8 GB, plug it into your ARTIK 10, set the SW2/1 switch on and SW2/2 off.
Now when you turn on the ARTIK 10, it will by default try to boot the OS on its eMMC. In order to stop that from happening hit any key (from any external keyboard connected to your ARTIK 10) after you power up the board so that you are redirected to Uboot’s shell. Now Change these Uboot variables : set rootdev 1 ; set rootpart 3 ; boot
|
1
2
3
4
5
6
7
|
ARTIK10 # version
U–Boot 2012.07–g801ab1503–TIZEN.org (Jun 20 2016 – 15:27:02) for ARTIK10
gcc (Tizen/Linaro GCC 4.9.2 2015.02) 4.9.2
GNU ld (GNU Binutils) 2.25.0 Linaro 2015_01–2
ARTIK10 # env default -f ;
ARTIK10 # set rootdev 1 ; set rootpart 3 ; boot
|
After a brief waiting time for the first boot, you will be prompted to login as root and the password will be “tizen”.
The Hard Way- Building your own image (ARTIK 5 and ARTIK 10)
Download the latest Tizen boot image-
From here for ARTIK 5
From here for ARTIK 10
Setting up the micro SD card (8 GB min.)
|
1
|
git clone https://github.com/tizen-artik/sdboot -b master
|
Plug in your micro SD card with the help of a card reader to your PC and then identify the node it is assigned with. Just to help yourself from getting into any trouble, try not to have any other USB storage device connected to your PC.
|
1
2
|
lsblk
disk=/dev/sdX # replace X with matching letter
|
Now partition the sd card and format it with a minimum of 6 partitions.
|
1
|
sudo bash –x ./mk_sdboot.sh –f “$disk”
|
ARTIK 10 users will have to additionally have to put this line of code in order to change the tzsw.bin configuration and the offset value which was found to be causing an error as it was similar to the ARTIK 5.
|
1
|
sudo bash –x ./mk_sdboot.sh –w /dev/sdb tizen–sd–bootloader–artik10.tar.gz
|
Now that the bootloader has been configured, the next step is to load the linux kernel has to be loaded into the first partition and its modules on to the second. Use this code to achieve that-
|
1
|
sudo bash –x ./mk_sdboot.sh –w “$disk” tizen–*–boot–armv7l–artik10.tar.gz
|
For ARTIK 5:
|
1
|
sudo bash –x ./mk_sdboot.sh –w “$disk” tizen–*–boot–armv7l–artik5.tar.gz
|
Although, you’re now ready to boot the Tizen on your ARTIK, you can additionally load the Tizen Root File system on the third partition by following this code:
|
1
|
sudo bash –x ./mk_sdboot.sh –w “$disk” tizen–*–3parts–armv7l–artik.tar.gz
|
You now have a bootable SD card of Tizen OS.
Booting up on Tizen
Just like I explained earlier, to boot up the ARTIK board from the SD card, set the SW2/1 switch on and SW2/2 off and then power up your ARTIK board. In order to stop your ARTIK from booting the default OS in your eMMC, hit any key (from any external keyboard connected to your ARTIK 10 or the bluetooth keyboard connected to the ARTIK 5) after you power up the board so that you are redirected to Uboot’s shell. Change these Uboot variables : set rootdev 1 ; set rootpart 3 ; boot
|
1
2
3
4
5
6
7
|
ARTIK5 # version
U–Boot 2012.07–g801ab1503–TIZEN.org (Jun 20 2016 – 15:27:02) for ARTIK5
gcc (Tizen/Linaro GCC 4.9.2 2015.02) 4.9.2
GNU ld (GNU Binutils) 2.25.0 Linaro 2015_01–2
ARTIK5 # env default -f ;
ARTIK5 # set rootdev 1 ; set rootpart 3 ; boot
|
|
1
2
3
4
5
6
7
|
ARTIK10 # version
U–Boot 2012.07–g801ab1503–TIZEN.org (Jun 20 2016 – 15:27:02) for ARTIK10
gcc (Tizen/Linaro GCC 4.9.2 2015.02) 4.9.2
GNU ld (GNU Binutils) 2.25.0 Linaro 2015_01–2
ARTIK10 # env default -f ;
ARTIK10 # set rootdev 1 ; set rootpart 3 ; boot
|
The kernel, device tree and rootfs are then loaded and executed in the following process:
|
1
2
3
4
5
6
7
8
9
10
11
12
13
14
15
16
17
18
19
20
21
22
|
reading zImage
5339682 bytes read in 67299 ms (77.1 KiB/s)
reading exynos5422–artik10.dtb
69754 bytes read in 117983 ms (0 Bytes/s)
reading uInitrd
1353683 bytes read in 29687 ms (43.9 KiB/s)
## Loading init Ramdisk from Legacy Image at 43000000 …
Image Name: uInitrd
Image Type: ARM Linux RAMDisk Image (uncompressed)
Data Size: 1353619 Bytes = 1.3 MiB
Load Address: 00000000
Entry Point: 00000000
Starting kernel ...
[ 0.092805] [c0] /cpus/cpu@0 missing clock–frequency property
(...)
[ 0.093269] [c0] exynos–snapshot: exynos_ss_init failed
[ 0.335618] [c5] Exynos5422 ASV : invalid IDS value
(...)
Welcome to Tizen 3.0.0 (Tizen3/Common)!
(...)
|
Logging in to Tizen
After a brief waiting time for the first boot, you will be prompted to login as root and the password will be “tizen”. You have now successfully booted into Tizen 3.0 common on your ARTIK dev board!
Thanks Phil for the original guide 🙂


