Smart home Lights in recent times have become quite common thanks to the growing IoT market. But more recently, we are getting to see these lights being controlled with just the power of voice (instead of apps) through AI assistants on people’s phones, speakers, computers, etc. However, these Smart Lights haven’t yet beaten the conventional lights in terms of price and hence require a bit of an investment. So, if you have a Raspberry Pi lying around, we will show you how you can make your own Smartlight with a dumb one that can be controlled using Google Assistant. The project will involve playing around with IFTTT and Particle services so below is a bit of background about them-
IFTTT – (if this then that) is a free platform that helps your apps and devices work together in new ways. It has become the room of automation service for improvement. IFTTT supports social media sites, online tools, and email and service such as Twitter, Gmail, Facebook. The automations are accomplished via applets that connect multiple apps to run automated tasks. You can turn on or off an applet using IFTTT’s website or the IFTTT widgets. You can also create your applets or make variations of existing ones. It’s actually quite simple once you start playing around with it.
PARTICLE – An IoT company that produces internet-connected microcontroller boards. The company also has a cloud service called Particle cloud which makes it easy to connect particle devices over the internet. From robust security to reliable infrastructure, to a flexible integration system, the particle cloud has everything you need to succeed and can move quickly. In the recent times, particle cloud added raspberry pi to their service i,e, you can connect your Raspberry Pi to the particle cloud for free. The development is currently in beta but is still very functional for most parts.
At the end of this tutorials, you’ll be able to a dumb bulb or lamp like those expensive Smarthome light via Google Assistant using IFTTT and Particle cloud.
1. Prerequisites:
- Raspberry Pi (with Raspbian OS).
- Relay module (To control the lamp / bulb).
- WiFi Dongle (for non-wifi variants of Raspberry Pi).
- Jumper Wires.
- Lamp/Bulb with Bulb Holder.
- 1mm or higher Guage wires.
- 5V Power Supply (For the Pi).
2. Circuit and Wiring:
The Particle Agent follows its own GPIO labeling and doesn’t follow the conventional Raspberry Pi Labeling which can be found below-
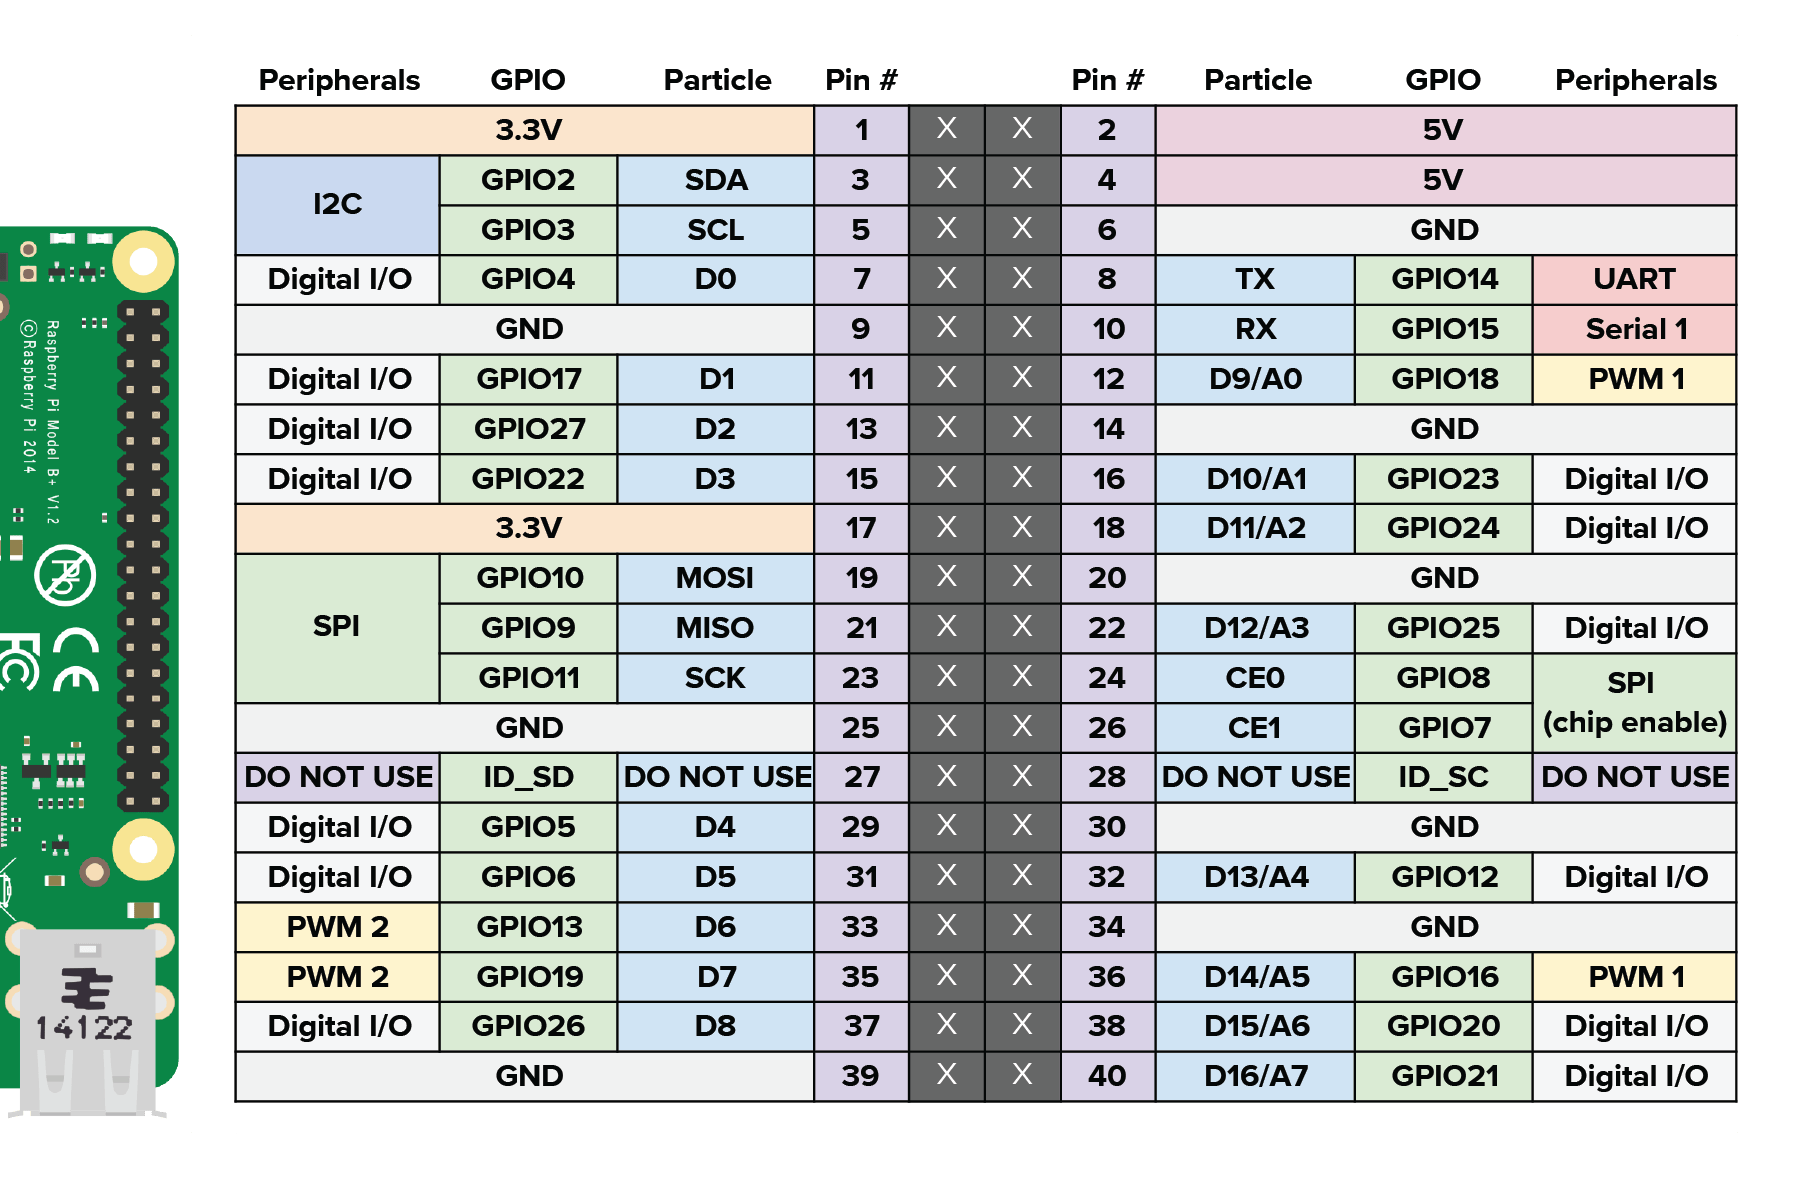
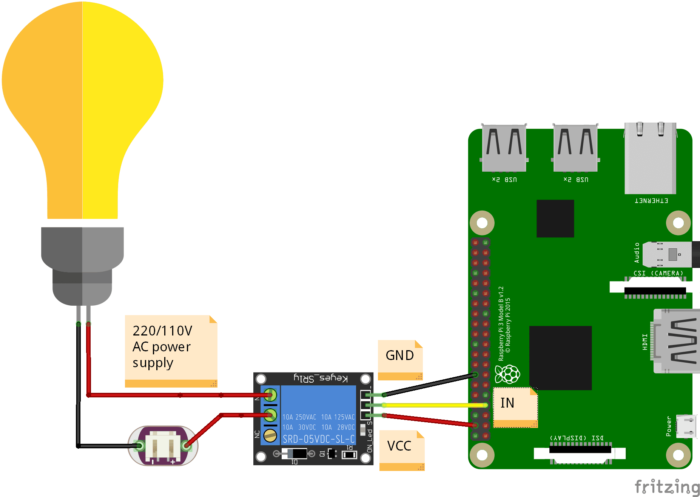
We will be using GPIO4 which is D0 according to Particle to control our Relay module as shown in the circuit below-
3. Particle agent Setup:
Install the particle agent by typing or pasting the following command in a terminal on your Raspberry Pi-
bash <( curl -sL https://particle.io/install-pi )
After the download and install process is complete, you will need be prompted to sign-in to your Particle account on the Raspberry Pi. To do that, first sign up for a Particle cloud account from here. Then give your Pi a name when asked, this is just for the reference and to distinguish from the other devices. If you want to roll back to sign in type particle-agent setup which will restore the Particle package to default values. Now type particle-agent status to know if your Pi is connected to the Particle Cloud
4. Create a Particle App:
Over on the computer, go to particle website, that is build.particle.io. You will be doing all the coding on Particle’s online IDE and then remotely flashing it on your Particle connected Raspberry Pi. Particle IDE is broken into three sections- The Coding environment where you write your code, Examples app where you can also make your own app and finally the Menu section where you have got many options like checking the connected Devices, activities, etc.
Now, create a “New App” and copy the following code into your app-
int relay = D0; //pin to which relay is connected
int boardLed = D7;
bool vin = LOW; //a virtual boolean variable
// setup() is run only once, it's where we set up GPIO and initialise peripherals
void setup() {
// Setup GPIO
pinMode(relay,OUTPUT); // relay pin is set as output
digitalWrite(relay,HIGH);
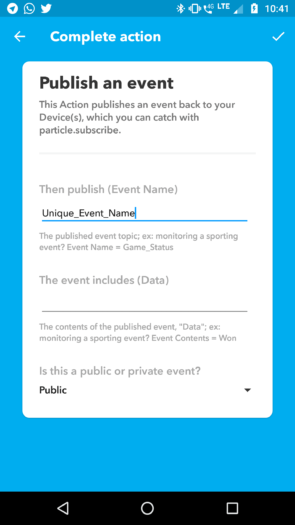
// Subscribe to events published by IFTTT using Particle.subscribe
Particle.subscribe("Unique_Event_Name", myHandler); //turning off function declaration
Particle.subscribe("Unique_Event_Name2", thisHandler); //turning on function declaration
}
// loop() runs continuously, it's our infinite loop.
void loop() {
if (vin==HIGH)
{
digitalWrite(relay,LOW);
}
else if (vin==LOW)
{
digitalWrite(relay,HIGH);
}
}
//our events are called when IFTTT applets are triggered
void myHandler(const char *event, const char *data)
{
vin=LOW;
}
void thisHandler(const char *event, const char *data)
{
vin=HIGH;
}
Enter your own unique event names inside the Particle.subscribe functions declaration as you will be needing later to set up the IFTTT events. example- “mylight_assistant_on” and “mylight_assistant_off”. Click the flash icon to flash the code onto your Pi. Make sure that there is no compilation error shown at the bottom of the screen.
5. IFTTT Setup
We are now at the final stage of the software side of things. Download the IFTTT app on your Android device or head over to ifttt.com, here we will be showing the setup on a smartphone but it is similar if you’re doing it on a browser as well. The first time you open the app, you’ll have to signup for a new account. Once that’s done, on the bottom of the screen tap on the icon at the extreme right which will take you to the My Applet section-
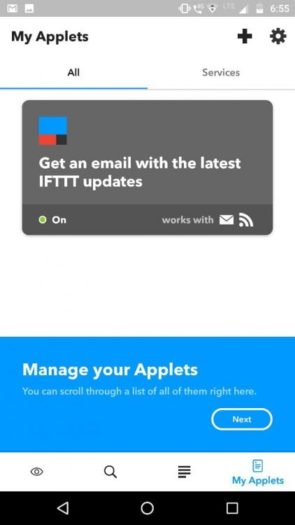
Tap on the “+” icon at the top to create a new applet. And then you will be taken to a new screen. Tap on the blue “+this” text and then search for Google Assistant and tap on the first result. If this is your first time with IFTTT and Google Assistant, then IFTTT will ask you to login to your Google account connected to the Google assistant and prompt for access to the service.


In the same way, create another Applet for the turning Off process by setting up the this and then part with Google Assistant and Particle respectively.
And you’re done! Now have fun talking with your Google Assistant to control your self-made Raspberry Pi based Smarthome light. Do tinker with the circuit and Particle Code to add more lights, sequences, etc.