Amplify is a new service that lets you clip the things you see and read on the web and share them with others through social media, blog posts, and even Twitter. If that sounds a lot like what Clipmarks does, you’re right. You see, Amplify was made by Clipmarks’ creators and it almost seems like a variation on their theme of “clip and share.” But if we had to choose between the two services, we think Amplify is the better choice today.

How to Use Amplify
Like Clipmarks, Amplify works via a browser extension. When you click the button it adds to your toolbar, orange boxes appear on the page you’re viewing allowing you to select the text you want to clip. You can also select text using your mouse. The boxes surround the text up until a paragraph break, so if you want to add more text to your clipping, you just have to click again on the following sections until you’ve grabbed all you want to save. Images can be clipped as well.

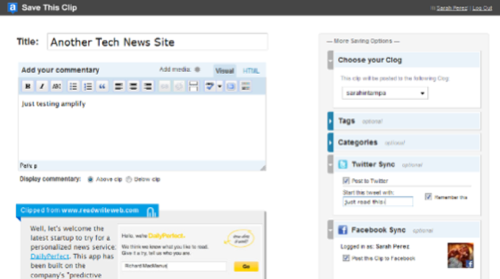
The next step is to click the “Click Here to Amplify it!” button. That brings you to your clip blog’s “Save page” where you can fill in more info like the title of the post and any additional commentary you want to add. By the way, your clip blog is called a “Clog,” which is kind of funny, but to be honest, we’re not entirely sure the term will catch on.
The clip blog reminds us a lot of Tumblr site, a scaled down blog platform for sharing tidbits from around the web. (If you’d rather post to your WordPress, Blogger, TypePad, or LiveJournal site, you’d be better off using the Clipmarks solution instead.)

Before you post to your “clog,” you have the option to check a box and post the clip to Twitter. You can even customize how the beginning of the tweet should read. If you look further down the page, you’ll see a link that says “post this clip to Facebook, Delicious, or Clipmarks.” Clicking here will take you to a new page where you can configure these services, too.
Once you’ve added the additional services, they’ll be checked by default every time you clip something and post to your clip blog. If you don’t want to always tweet or update Facebook, you’ll have to uncheck the checkboxes on the “Save this Clip” page with each use of Amplify. We wish there was a setting that would let those boxes be unchecked by default for those of us who don’t want to over-share.
If you decide later that you want to add or remove services, you can no longer do so from the “Save clip” page of your blog – you’ll have to log into Amplify and access your Admin settings from there – a bit of an annoyance, but one we can live with.
Great Features: Groups and Sharing from Your RSS Reader
There are three features that make Amplify the better choice for clipping, in our opinion: Twitter sharing, of course, but also groups and the ability to share from RSS. The groups feature lets multiple users from a business, organization, class, etc. create a community site to which they all contribute. Because the groups can be synced with Twitter and Facebook, this can be an easy way to keep up a shared Twitter account or Facebook page.
The other great feature for voracious RSS users is the ability to share clips directly from your feed reader, be it Google Reader or Bloglines. When you use Amplify from either of these services, it will find the source URL and link back to the original page – not the feed URL. That makes Amplify a handy way to tweet, bookmark, or share the best content from your feeds without having to open up the article in a separate window.
To get started with Amplify, sign in from the main page using your Twitter account. If you don’t use Twitter, you can create an Amplify account instead. You’ll then see the option to install the browser extension (Firefox only) which is the last step before you can start using the service. For more info on Amplify, you can view the YouTube video embedded below.


