This is the first in a series of tutorials on developing a full featured version of Breakout. This tutorial will cover drawing primitive objects on the screen using the Canvas element and developing the basic game screen.
Before we get started, check out the finished Breakout game demo. We will be recreating this game over the series.
All of our development will be for HTML5 capable browsers that properly support the HTML5 Canvas and Audio tags (Chrome, Safari, Firefox, Opera and maybe Internet Explorer 9). Make sure you have one of these browsers.
Now let’s get started.
First we create a simple HTML file with a canvas inside it
<html>
<head>
<meta http-equiv=”Content-type” content=”text/html; charset=utf-8″>
<title>Breakout – A fast fun game</title>
<script src=”//ajax.googleapis.com/ajax/libs/jquery/1.4.2/jquery.min.js”></script>
<script>$(function() {
// All our code will go here. jQuery will run this after the document loads completely
});
</script>
</head>
<body>
<style type=”text/css”>
canvas {
border:1px solid black;
}
</style>
<h1>Breakout</h1>
<canvas id=”canvas” width=”400″ height=”500″>
Your browser does not support the HTML5 Canvas feature. This game uses new HTML5 features and will only work on the latest versions of Firefox, Safari or Chrome (and maybe Internet Explorer 9).
</canvas>
</body>
</html>
We also include jQuery to make cross browser development easier.
To start using the Canvas we need to get its 2d context which then gives us access to all the drawing methods we need.
This creates a Canvas element with dimensions 400 x 500 with a black border around it. If you open the HTML page in your browser, all you will see is a black rectangle on an empty white screen. In case your browser does not support HTML5 Canvas, it shows the unsupported feature message.
We also include jQuery to make cross browser development easier.
To start using the Canvas we need to get its 2d context which then gives us access to all the drawing methods we need.
|
1
2 3 4 |
// this is the same as document.getElementById(‘canvas’);
var canvas = $(‘#canvas’)[0]; // different browsers support different contexts. All support 2d var context = canvas.getContext(‘2d’); |
With this context object, we now have access to the methods that we will need for our game like fillRect(), clearRect() and drawImage().
Now that we can draw, lets start with creating the paddle.
var paddleX = 200;
var paddleY = 460;
var paddleWidth = 100;
var paddleHeight = 15;
var paddleDeltaX = 0;
var paddleDeltaY = 0;
function drawPaddle(){
context.fillRect(paddleX,paddleY,paddleWidth,paddleHeight);
}
Note that we store all the parameters in variables so that we can easily modify and reuse them later. Drawing the paddle is as simple as using the fillRect() method.
Now lets draw the ball.
var ballX = 300;
var ballY = 300;
var ballRadius = 10;
function drawBall(){
// Context.beginPath when you draw primitive shapes
context.beginPath();
// Draw arc at center ballX, ballY with radius ballRadius,
// From 0 to 2xPI radians (full circle)
context.arc(ballX,ballY,ballRadius,0,Math.PI*2,true);
// Fill up the path that you just drew
context.fill();
}
Drawing the ball requires the arc() method to draw a circular shape and the fill() method to fill the shape we just created. While drawing the arc, the starting angle is 0 and the ending angle is 2xPI radians (or 360 degrees) which makes a full circle.
Now lets draw the bricks on top.
var brickHeight = 20;
var brickWidth = canvas.width/bricksPerRow;// Brick Layout: 1 is orange, 2 is green, 3 is gray, 0 means no brick
var bricks = [
[1,1,1,1,1,1,1,2],
[1,1,3,1,0,1,1,1],
[2,1,2,1,2,1,0,1],
[1,2,1,1,0,3,1,1]
];// iterate through the bricks array and draw each brick using drawBrick()
function createBricks(){
for (var i=0; i < bricks.length; i++) {
for (var j=0; j < bricks[i].length; j++) {
drawBrick(j,i,bricks[i][j]);
}
}
}
// draw a single brick
function drawBrick(x,y,type){
switch(type){ // if brick is still visible; three colors for three types of bricks
case 1:
context.fillStyle = ‘orange’;
break;
case 2:
context.fillStyle = ‘rgb(100,200,100)’;
break;
case 3:
context.fillStyle = ‘rgba(50,100,50,.5)’;
break;
default:
context.clearRect(x*brickWidth,y*brickHeight,brickWidth,brickHeight);
break;
}
if (type){
//Draw rectangle with fillStyle color selected earlier
context.fillRect(x*brickWidth,y*brickHeight,brickWidth,brickHeight);
// Also draw blackish border around the brick
context.strokeRect(x*brickWidth+1,y*brickHeight+1,brickWidth–2,brickHeight–2);
}
First we store the bricks layout in an Array making it easier to visualize and modify. Feel free to try adding a few more rows, or changing the numbers to modify the layout.
We then iterate over each row and column and call the drawBrick() method to place the brick correctly. Within drawBrick(), we use a switch statement to set different fill colors for different types of bricks. This function can be extended to add more brick types.
Finally, lets create a simple scoreboard or status bar below.
function displayScoreBoard(){
//Set the text font and color
context.fillStyle = ‘rgb(50,100,50)’;
context.font = “20px Times New Roman”;
//Clear the bottom 30 pixels of the canvas
context.clearRect(0,canvas.height–30,canvas.width,30);
// Write Text 5 pixels from the bottom of the canvas
context.fillText(‘Score: ‘+score,10,canvas.height–5);
}
We can check the output of the code so far by calling each of the functions that we wrote.
2
3
4
5
drawPaddle();
drawBall();
createBricks();
displayScoreBoard();
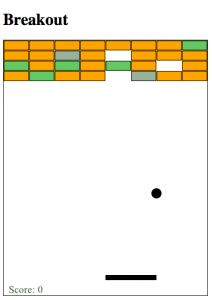
This is the final result. We have a complete game screen with all the elements drawn on it programmatically – the bricks, the paddle, the ball and the scoreboard.
It doesn’t seem like much yet. Everything is static. However, because we stored the parameters in variables, all we need to do to move objects around is change the parameter values and call the same functions again. Thats when things start getting interesting.
In part II of this series, we will use setInterval() to add some animation and capture keydown and keyup events to respond to user input.
You can download the finished source code for this tutorial below.
HTML5 Game Development Tutorial: Breakout Part I – Source Code
Continue to part 2 of this series. HTML5 Game Development Tutorial: Breakout Part II – Animation and Keyboard Input
This creates a Canvas element with dimensions 400 x 500 with a black border around it. If you open the HTML page in your browser, all you will see is a black rectangle on an empty white screen. In case your browser does not support HTML5 Canvas, it shows the unsupported feature message.
We also include jQuery to make cross browser development easier.
To start using the Canvas we need to get its 2d context which then gives us access to all the drawing methods we need.
Source Aditya Ravi Shankar


