Introduction
This installment of our series on developing HTML5 applications for AppUp focuses on authenticating with a remote service and displaying information relayed from that service. It covers the use of xmlhttp for communicating with a remote service, Oauth to authenticate with a service, callbacks for handling completed http commands and using HTML5’s local storage facility to save data between runs of the application.
For this example we will use Twitter as our remote service. Once authenticated, the Twitter client will display your Twitter feeds, letting you filter by Tweets that have been retweeted by you or someone you follow.
All of the source files described in this article can be downloaded from here.
Twitter in a Nutshell
Twitter is a microblogging service that lets you receive short posts from those people you “follow” through your Twitter account. When someone posts an update it is automatically distributed to anyone following that person; such an update is known as a Tweet. If an update is copied by a follower and repeated to his or her follower this is referred to as retweeting.
Overview of the Twitter Client
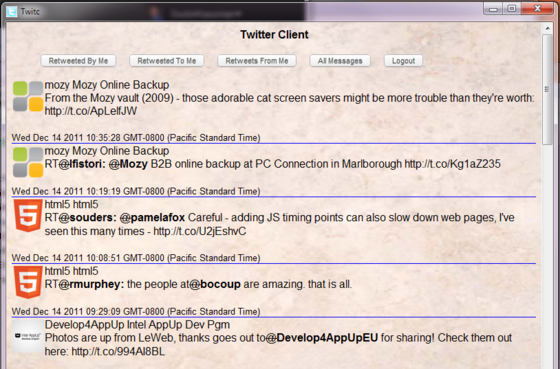
This simple client connects to Twitter using your Twitter account and displays the most current Tweets from those you follow. The first time you connect you will need to provide your Twitter username and password to enable the connection. At that point the latest feeds are retrieved and displayed in the main window. Along the top of the screen are buttons that will filter the displayed Tweets: Retweeted By Me, Retweeted To Me, Retweets From Me and All Messages. The last choice logs out and closes the application.

Figure 1: Twitter Client Main Screen
Talking with Twitter
Talking with Twitter
Twitter actually supports three APIs for communicating with its services; the Twitter client uses the REST (REpresentational State Transfer) API. The Twitter API is entirely HTTP-based, which means much of the code for this client deals with generating and receiving HTTP traffic. Everything you want to know about communicating with the Twitter platform can be found at the Twitter Developers web site.
Before the client can display the user’s Twitter traffic it must be authenticated to act on the user’s behalf. Twitter uses the open authentication standard OAuth for authentication. OAuth allows the client to obtain an access token that it uses to sign every request made to the API, which identifies the traffic as authorized to connect to the user’s Twitter account. The process is well-described on this page. In particular, you will want to review the diagram and code examples there.
The basic steps for authorization follow:
- Request access token from Twitter
- Twitter returns unauthorized access token
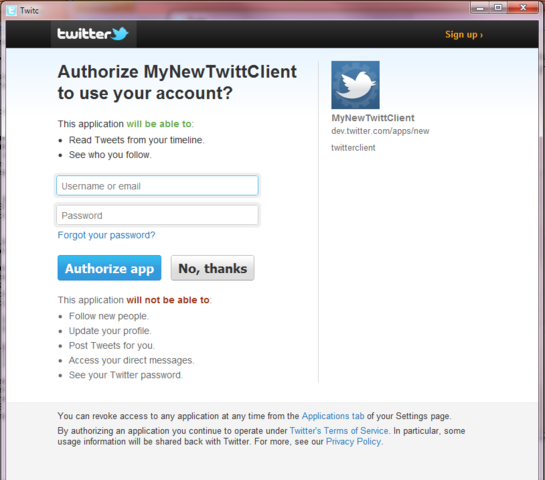
- Client redirects to Twitter user authorization page
- User gives OK for client to access his or her account
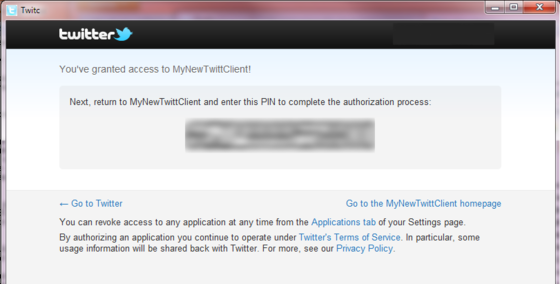
- Twitter authorization page displays a PIN
- User enters PIN into client
- Client uses PIN to obtain authorized access token
- Client uses this token to act on behalf of the user
Once authenticated, the client simply uses http GET and POST traffic to retrieve and display the user’s feeds. Again, refer to the Twitter API documentation.
Inside the Application
The main functionality of the client is written in JavaScript, look in the index.js file contained in the js folder. When the application is loaded the onLoad function is called; this function checks whether the client has been run before and an authorized access token was retrieved and stored locally. If so, it calls authenticationComplete which uses that token to retrieve all Tweets for the user.
function onLoad() {
    var body = document.getElemenById('bodyId')
    if (typeof(localStorage) != 'undefined' ) {
        var tmp_oauth_token = localStorage.getItem('user_oauth_token');
        var tmp_oauth_token_secret = localStorage.getItem('user_oauth_token_secret');
        if (tmp_oauth_token != null && tmp_oauth_token_secret != null && tmp_oauth_token != '' && tmp_oauth_token_secret != '') {
            user_oauth_token = tmp_oauth_token
            user_oauth_token_secret = tmp_oauth_token_secret
            authenticationComplete()
            return
        }
    }
body.innerHTML = '<div id="title">Twitter Client</div><div>Click on the "Get PIN" button below. It will open a new window where you can pass the authentication information and get a PIN code. Then enter the PIN code in the box below and click on "Sign In."<br><a href="#" onclick="getPin()">Get PIN</a></div><br><br><div><input id="pinCode" type="text"/><a href="#" onclick="signIn()">Sign In</a></div><br><div id="errorStr"></div>'
}
Listing 1: Function onLoad from file index.js
If the client has not been authenticated, onLoad displays a simple screen with a button that will connect to an authentication page at Twitter; the button does this through the getPin/twitterRequest functions. Notice the third line of twitterRequest registers getTwitterRequestAnswer as a callback function; this function is called every time the readyState changes. You will see the use of similar callbacks throughout this example.

Figure 2: Twitter Client Main Screen When Unauthenticated

Figure 3: Twitter Authentication Screen
function twitterRequest() {
    if (xmlhttp) {
        xmlhttp.onreadystatechange = getTwitterRequestAnswer
        var url = 'https://api.twitter.com/oauth/request_token'
        initRequest('POST', url, [['oauth_callback','oob']])
        xmlhttp.setRequestHeader('Content-Type', 'application/x-www-form-urlencoded')
        xmlhttp.setRequestHeader('Accept-Language', 'en')
        xmlhttp.send()
    }
}
Listing 2: Function twitterRequest from file index.jsThe getTwitterRequestAnswer function checks that the request completed successfully, parses the response and uses data from the response when opening the Twitter authentication page.
function getTwitterRequestAnswer() {
    if (xmlhttp.readyState == 4) {
        var response = xmlhttp.responseText.split('&')
        oauth_token = response[0].split('=')[1]
        oauth_token_secret = response[1].split('=')[1]
        oauth_callback_confirmed = response[2].split('=')[1]
        var frame_url = 'https://api.twitter.com/oauth/authorize?oauth_token=' + oauth_token + '&force_login=true'
        window.open(frame_url)
    }
}
Listing 3: Function getTwitterRequestAnswer from file index.jsThe Twitter authentication page displays a PIN that the user enters into the main client screen. Once done, the user clicks the Sign In button, which calls signIn, this uses the pin to retrieve the authorized access token. Handling the returned token is performed by the getAccessToken callback.

user_oauth_token_secret = response[1].split(‘=’)[1] user_id = response[2].split(‘=’)[1] screen_name = response[3].split(‘=’)[1] if (typeof(localStorage) != ‘undefined’ ) { localStorage.setItem(‘user_oauth_token’, user_oauth_token) localStorage.setItem(‘user_oauth_token_secret’, user_oauth_token_secret) console.log(‘user_oauth_token ‘ + user_oauth_token) console.log(‘user_oauth_token_secret ‘ + user_oauth_token_secret) } authenticationComplete() } }Figure 4: Twitter Authentication PIN
function signIn() {
    var pinCode = document.getElementById('pinCode')
    if (xmlhttp) {
        xmlhttp.onreadystatechange = getAccessToken
        var url = 'https://api.twitter.com/oauth/access_token'
        initRequest('POST', url, [['oauth_verifier', pinCode.value]], {token: oauth_token, secret: oauth_token_secret})
        xmlhttp.setRequestHeader('Content-Type', 'application/x-www-form-urlencoded')
        xmlhttp.setRequestHeader('Accept-Language', 'en')
        xmlhttp.send()
    }
Listing 4: Function signIn from file index.js
Once the returned token is extracted from the response and stored in local storage, the code calls authenticationComplete, joining the path it would have taken if there had been a token stored from a previous session.
function getAccessToken() {
    if (xmlhttp.readyState == 4) {
        var text = xmlhttp.responseText
        // Process errors
        if (text.indexOf("?xml") != -1) {
            if (text.indexOf("Invalid oauth_verifier parameter") != -1) {
                var error = document.getElementById('errorStr')
                error.innerHTML = 'Wrong PIN code. Please try again.'
                return
            }
        }
        var response = text.split('&')
        user_oauth_token = response[0].split('=')[1]
        user_oauth_token_secret = response[1].split('=')[1]
        user_id = response[2].split('=')[1]
        screen_name = response[3].split('=')[1]
        if (typeof(localStorage) != 'undefined' ) {
            localStorage.setItem('user_oauth_token', user_oauth_token)
            localStorage.setItem('user_oauth_token_secret', user_oauth_token_secret)
            console.log('user_oauth_token ' + user_oauth_token)
            console.log('user_oauth_token_secret ' + user_oauth_token_secret)
        }
        authenticationComplete()
    }
}
Listing 5: Function getAccessToken from file index.js
This straightforward function displays the main client screen and adds content to the main area through allMessage, which requests the Twitter feeds, parses and formats the response (through getAllMessage and parseAllMessage), and then displays the results.
function authenticationComplete() {
    var html = '<div id="title"><b>Twitter Client</b></div><nav><ul><li><a href="#" onclick="retweetedByMe()">Retweeted By Me</a></li><li><a href="#" onclick="retweetedToMe()">Retweeted To Me</a></li><li><a href="#" onclick="retweetsOfMe()">Retweets From Me</a></li><li><a href="#" onclick="AllMessage()">All Messages</a></li><li><a href="#" onclick="logout()">Logout</a></li></ul></nav><div id="content"></div>'
    var body = document.getElementById('bodyId')
    body.innerHTML = html
    allMessage()
}
Listing 6: Function authenticationComplete from file index.js
function allMessage() {
    if (xmlhttp) {
        xmlhttp.onreadystatechange = getAllMessage
        var url = 'https://api.twitter.com/1/statuses/home_timeline.json'
        initRequest('GET', url, [], {token: user_oauth_token, secret: user_oauth_token_secret})
        xmlhttp.setRequestHeader('Content-Type', 'application/x-www-form-urlencoded')
        xmlhttp.setRequestHeader('Accept-Language', 'en')
        xmlhttp.send()
    }
}
Listing 7: Function allMessage from file index.js
function getAllMessage() {
    if (xmlhttp.readyState == 4) {
        var content= document.getElementById('content')
        content.innerHTML = parseAllMessage(xmlhttp.responseText)
    }
}
Listing 8: Function getAllMessage from file index.js
function parseAllMessage(response) {
    var obj = eval(response)
    var result = ''
    for (var i = 0; i < obj.length; i++) {
        var text = processTextMessage(obj[i].text)
        result += '<div data-item-id="' + obj[i].id_str + '">'
            result += '<div>'
                result += '<div>'
                    result += '<img height="48" width="48" src="' + obj[i].user.profile_image_url + '">'
                result += '</div>'
                result += '<div>'
                    result += '<div>'
                        result += '<span>'
                            result += '<span>' + obj[i].user.screen_name + '</span> '
                            result += '<span>' + obj[i].user.name+ '</span>'
                        result += '</span>'
                    result += '</div>'
                    result += '<div>'
                        result += '<div>'
                            result += text
                        result += '</div>'
                    result += '</div>'
                    result += '<div>'
                        result += '<br><small>' + (new Date(obj[i].created_at)).toString() + '</small>'
                    result += '</div>'
                result += '</div>'
            result += '</div>'
        result += '</div>'
    }
    return result
}
Listing 9: Function parseAllMessage from file index.js
Filtering the Twitter feed is done by calling the appropriate Twitter API. The results are handled the same as the full Twitter feed.
The final capability, logging out, simply erases the stored authenticated token from local storage and exits the application. If the program is closed without calling logout the authenticated token will remain in storage for use the next time the client is run.
Summary
The Twitter client is a simple application for displaying your Twitter feeds. It demonstrates the use of xmlhttp for communicating with a remote service, Oauth to authenticate with that service, callbacks for handling completed http commands and using HTML5’s local storage facility to save data between runs of the application. While simple, the HTML5 concepts demonstrated in this program are applicable to a wide range of situations.
This completes the five part series on Developing HTML5 Applications for AppUp, I hope you found the articles useful.
I would like to acknowledge the help of several of my colleagues at ICS in the creation of these articles. In particular my thanks go to Alexandr Makaryk and Denis Sapon who developed the example applications, and Dustin Kassman who helped with the writing of the articles.
Source Intel AppUp(SM) Developer Program


