Part of the fun of being a Mac user has always been making minor modifications. Within Apple’s defined parameters, Apple geeks love to change icons, colors and backgrounds; tweak menu items; script little macros and otherwise make their computers their own. On OS X, if GUI options are not enough, we can open up a terminal and plumb the depths of the system.
But iOS, Apple’s more popular operating system, is different. Apple’s word is law there. Power users of other platforms criticize iOS for its strictness. As a lifelong Mac geek, I’m used to having the freedom to fiddle. I needed to know whether I was surrendering freedom for convenience. So I embarked on a jailbreaking experiment.
My test device is an iPod Touch. I didn’t want to jailbreak my phone in case it caused problems with apps I use or bricked my device. Plus, I love the iPhone software the way it is. The almost completely broken home button… well, that’s another matter.
But I got an iPod Touch to be my experimental ninja device. I wanted to push it as far as I could. If Apple was limiting me in any way, I wanted to break those limits.
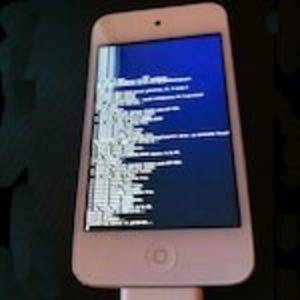
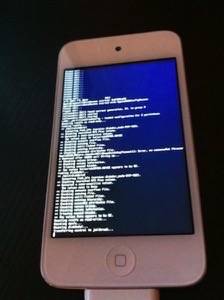
I had no idea what I was doing. Fortunately, through jailbrea.kr and RWW’s jailbreaking resources, I found the untethered jailbreak for non-A5 devices running iOS 5. It only took a few minutes to set up, and I was in.
Now what?
Files and Folders
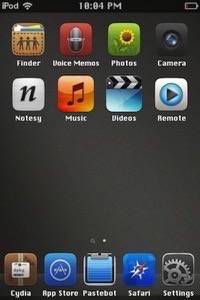
After my iPod rebooted, the most immediately noticeable difference was the presence of the Cydia store. There are other stores out there, but Cydia allows you to add and search other package sources. That’s as far out there as I was willing to go. I didn’t want to get lost.
Apple’s App Store is still available, and I quickly installed a few of my apps to make the setup faster. The first one I installed was Pastebot, which would make it easier to move files by copying and pasting between my iPod, my Mac and other iOS devices.
SEE ALSO: Our interview with chpwn, expert jailbreaker and iOS developer.
If you don’t want to buy Pastebot, emailing things to yourself could accomplish the same thing.
But this felt a little bit like cheating. Jailbreaking offers access to the device’s file system, which Apple doesn’t want iOS users to bother thinking about. Instead of just bouncing simple media files around within apps, I could put things directly into the folders the system uses.
Access to the file system also allows you to install new software on the device, bypassing app stores. This is out of scope for this guide, but it is certainly possible.
To stretch my legs and get a sense of my capabilities, I started exploring the iOS file system.
There’s a user guide for “Copying Files to/From Device” right in the main menu of the Cydia store. There are several options. The first one listed is to actually SSH into the device, but that seemed like overkill. Some non-Mac users might have no choice, though there seem to be Windows applications that could help. But if you don’t know how to do it the hard way, it’ll be a good learning experience.
Still, I went with option two. I installed a program called Netatalk that allows my jailbroken iPod to show up in my Mac’s Finder like any other shared device. So I can browse the contents of my iPod wirelessly on my desktop computer. As a training exercise, I decided to put my awesome Legend of Zelda secret ringtone directly into the system’s ringtones folder instead of syncing it through iTunes. “Zelda” showed up in the Settings.app list right after “Xylophone.”
The guide also introduced me to a package called iFile, which is basically a Finder onboard the iPod, so I could access the file system on the device itself.
Now I’m fired up. This feels like a real computer. Now I’m off to do… something!
Changing the Look
Fortunately, the Cydia store has a “featured” section and is fairly browsable. So I set out in search of neat things. The obvious place to start was themes.
There are thousands of themes in the Cydia store and thousands more elsewhere. Many of them offer little screenshots like App Store apps do, but those don’t help much. I mostly just had to go by name and description. There’s a package called WinterBoard that appears in the Settings app and lets you easily turn themes on and off or even mix and match parts of them. I decided not to bother with any themes that weren’t WinterBoard-ready.
I’ll be blunt. Theming was a huge letdown. I did not find a single theme that appealed to me over the way iOS looks naturally. Some of the paid ones looked nice, but not nice enough. I found a few free themes I sort of liked, so I installed them, and that led to another problem: Many of these themes are not up-to-date for iOS 5. So most of the icons would look right, but the Music and Videos apps would be unaffected.
Some of the complete themes also advertise the ability to apply “smart” icons to apps for which they don’t have custom icons. At least for the themes I tried, this was largely a lie. At best, they just crop the existing icon to whatever new shape and size the theme’s icons have, which looks awful.
The most interesting and complete theme I found was called 266hd Icons. It was a fairly complete set, and I liked the look of the simple, small, black-and-white icons.

Glasklart was also cool. It was still minimal and grayscale, but the icons were full-size and contained a little more detail. It was missing some built-in iOS 5 icons, however.

The third theme I liked was Suave HD. This one was full-color and gentle-looking. It was also missing the Music.app and Videos.app icons, but they looked similar enough to the rest of the theme, apart from being too large. It was also the best at cropping unknown third-party icons to look like a decent match with the theme.
I couldn’t resist trying some of the Android-esque modifications. They were mostly abominable. The most interesting one I found was called iAndroid, which actually launches from Springboard like an app and offers its own UI. It had a more involved installation process that concluded with an amusing fake-Google loading screen.
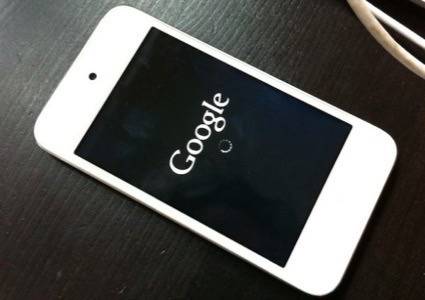
Launching iAndroid turns your iPhone into this:
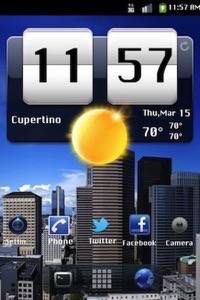
These widgets even kinda work. But this isn’t exactly what I’d call an improvement to the device.
At some point, I found BytaFont, which allowed me to change my system font to Chicago like an old-school iPod. I’m pretty pleased about that decision. I couldn’t figure out how to turn it off without uninstalling it, though, so I apologize for the inexplicable Chicago in some of these screenshots.
One other final UI tweak I enjoyed was Icon Renamer, which allows you to tap on any app icon in wiggly mode and rename it to whatever you want.
Deeper System Tweaks
My theming experiences weren’t so great, but the real benefit of jailbreaking is the ability to change the way the system actually works. Some modifications offer new gestures and tap actions. Activator is a package that lets you assign common tap and slide gestures to a huge range of system actions.
There are also packages that profoundly change the behavior of Springboard (Apple’s process that makes the home screen work). A great example shown to me by jailbreak aficionado chpwn is Aaron Ash’s Barrel.
Other such tweaks are more minor, but they still change Apple’s default experience in interesting ways.
I hate the inability to hide built-in Apple apps that I never use, and a package called SBSettings allows just that. You can hide any app from the Springboard that you don’t want. Another package called NoNewsIsGoodNews will hide iOS 5’s Newsstand folder.
A tweak I often see in jailbroken iOS screenshots is Five Icon Dock. It seems neat at first, but in practice I think it’s too crowded. It’s too easy to launch the wrong app by accident. Apple knows what it’s doing on decisions like the number of icons in the dock.
Other minor tweaks I liked were NoLockScreen, which lets you skip the slide-to-unlock gesture and go straight to your home screen from sleep. Even little tweaks like “Pull to Refresh Safari” change the way I use the device.
Should I Jailbreak Or Not?
If any of these modifications appeal to you, you’ll have fun jailbreaking. I personally wouldn’t risk messing up my phone doing it, but if you back it up to iTunes first, you might find it worth the risk.
One obvious benefit of jailbreaking an iPhone – or an iPad with 3G or LTE – is the ability to tether for free. I wasn’t able to try this, since I jailbroke a Wi-Fi-only device, but this could be worthwhile and save a little money.
“If you don’t know how to do it the hard way, it’ll be a good learning experience.”
If you want access to the file system, jailbreaking is the only way to get it. You can also install all kinds of privacy and encryption tools that iOS doesn’t offer. For people comfortable at the edge of their computers’ capabilities, a jailbroken iOS device offers lots of freedom onboard some of the world’s best hardware.
Is it worth jailbreaking just to tweak the UI of your device? Maybe. It felt like groping around in the dark looking for a cool theme or an extremely useful gesture or shortcut. The ability to swipe left or right for multitasking doesn’t seem that exciting to me, but some users might enjoy it.

There are also definite reasons not to jailbreak. Aside from losing data or corrupting the device by breaking something, you won’t be able to update your system or many of your apps, and you’ll be on your own for support. Developers can’t help you with bugs caused by jailbreaking. If you need reliability and support for your software, you probably shouldn’t jailbreak.
But if you, like me, are the kind of geek that just needs to know what’s possible on your device, give it a shot. It’s the total opposite of the easy, painless experience of using iOS day-to-day. In fact, going back to my legit iOS devices after a day on this iPod made me appreciate Apple’s decisions all over again.
Are you a jailbreaker? What jailbroken devices do you use? What are your favorite modifications?