Yesterday, Facebook rolled out an update to its “Groups” feature, revealing a completely revamped experience that now offers collaboration capabilities, email subscriptions, group chat and more. You can create a group of your own, as always, but you can’t necessarily join any group out there on Facebook – unless the group is set to “open,” you have to be invited by a current group member.

Facebook CEO Mark Zuckerberg says the Groups feature was designed to allow the 5% of people who actually use features like this to do the job of building the groups for the rest of Facebook’s user base. Are you among the 5% who wants to create and manage groups of your own? If so, here’s how.
Step 1. Create a Group
If you’ve been updated to the new version of Facebook, you should see a link to “Create Group…” in the left-side navigation underneath the links to “News Feed,” “Messages,” “Events” and “Friends.” You’ll also see groups you’re already a member of listed here, ranked by how frequently you access them. If you’re a member of a lot of groups, you’ll have to click “See All” to be taken to the complete list.
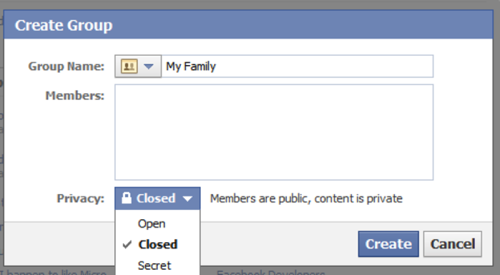
After clicking “Create Group…”, a box will pop up asking you to name the Group, select its members and set the privacy level. The name can be anything of your choosing. To the left of the Group name, you can click the default Groups icon to see a list of other icons to choose from. It’s an extensive list, so keep scrolling down to see all the options.

Next, you’ll add Group members. They are pulled from your own Friends’ list on Facebook. That can be problematic if you’re trying to build a group for people at an organization or business who you aren’t already connected to as a Facebook friend – you’ll have to either friend them to invite them, or leave it up to another group member to do so.
Finally, you’ll pick the group’s privacy level. This is really important. By default, it’s set to “Closed,” but you can change it depending on how you want your group to operate.
The three options are: open, closed and secret. Here’s what they mean:
- Open: For Open groups, everyone on Facebook can view the group and join. The group will appear in search results and all content (e.g., photos, videos and discussions) is visible to anyone viewing the group.
- Closed: For Closed groups, everyone on Facebook can see the name and members of a group, but only group members can view content in the group.
- Secret: These groups cannot be found in searches, and non-members can’t see anything about the group, including its name and membership list. The name of the group will not display on the profiles of members.
After choosing the privacy level, click the “Create button” to complete the setup process.
Step 2: Edit Group’s Description & Profile Picture
As soon as you’ve created the group, you’re taken to its homepage. Now you can complete the setup process by further editing the group settings.
During group creation, you weren’t given the opportunity to write a description of the group, but you can do so now. Click the “Edit Group” button at the top right and enter a description in the box provided.
Here, you can also change the privacy level and icon, if you need to make changes.
You’ll also want to pick out an email address for your group, if you plan to allow members to post to the group via email. To add an email address, click the “Choose Email” button and type in the name you want. If it’s not available, Facebook will prompt you to choose another. Group email addresses will all end with @groups.facebook.com.

Click “Save Changes” when finished on this screen.
Step 3: Add a Profile Picture for Your Group
Click “Edit Group” again. On the far right of the screen, you can also click the link to “add a profile picture” for your group. Like Facebook user profile pictures, you can either take a picture using your computer’s webcam or you can upload a photo from your PC.
Step 4: Edit Your Group Notifications
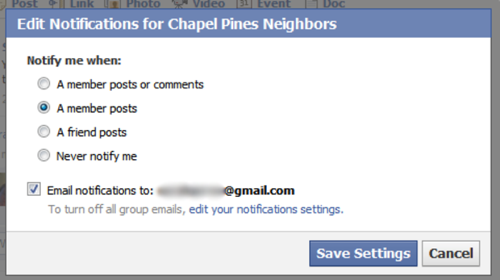
You can also personalize how you want to be notified of changes to the group by clicking the “Edit Notifications” button, also at the top right of the group’s homepage. Here, you can change how you want to be notified (via Facebook’s built-in notification feature), selecting from the options: “whenever a member posts,” “whenever a member posts or comments,” “when a friend posts” or you can choose to never receive notifications for the group. You can also check or uncheck the box for email notifications. By default email notifications are set to “on.”

Note that these settings are just for you – each group member will have to set their own notification preferences.
Step 5: Add Content to the Group’s Homepage
You obviously started the group for a reason, so now it’s time to add content. You can post status updates to the group, which, for “closed” or “secret” groups, makes this feature function like a private version of Facebook just for group members. (Finally! A way to talk to your friends without Mom and Dad knowing, right? Uh-oh. Mom and Dad: that means if your child has a Facebook account you supervise, it’s no longer good enough to just be their “friend” – you’ll need their login credentials, too.)
Group members can also add links, photos, videos and events to the group page, too – all of these settings are available from the “Share” box at the top of the group’s homepage.
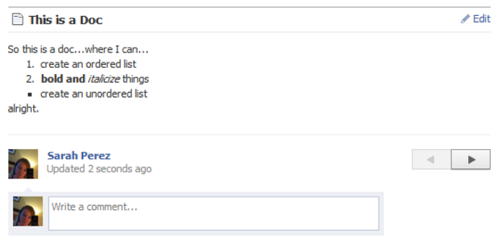
One new feature in Groups is something called “Docs.” This lets you add a very basic document to the group, which provides an easy way to add long-form content without dominating the News Feed with a lengthy post. Instead, the News Feed item will just say that you created a doc and will link to it.

These new docs are sort of like wikis, as they can be created or edited by any group member. As docs are edited, previous versions can still be accessed using the arrow buttons at the bottom of the doc. To access a doc from the News Feed or group homepage, just click its title (the link).
Step 6: Start a Group Chat
Group chat allows members to participate in a group instant messaging session with other group members. To see who’s online to chat, open the group chat window. Photos of the other online group members will appear at the top.
If you don’t want to participate in group chat, you can either click the Chat window to minimize it or go offline completely.
Don’t Like Groups? Leave Them!
You can’t opt out of Groups altogether, but you can leave groups you’ve been added to by your friends or those you’ve joined. If you joined groups in the past before Facebook launched its new Groups feature, they will still be listed when you click “See All” from your Facebook homepage.
To leave groups, click the group’s title then scroll down on the group’s page until you see the “leave group” button on the bottom left (above the “Share” button) or just click the small “x” next to the group name in the list of all your groups.

You’ll probably be surprised how many groups you had joined. The feature used to be a way to “like” things before the “like” button was available on the Web. People would often join groups with a funny title (like “When I was your age, Pluto was a planet“) so the slogan would appear in their News Feed for others to see. Those groups rarely served a purpose beyond the initial joke, so now may be a good time to leave these old groups and de-clutter your list.
For more information on Groups, see our analysis of Groups here: “Why Facebook’s New Groups Will Change the Way You Use Facebook.” For extensive details on opting out of Group notifications, visit this pageon O’Reilly Answers.


